
How to Crochet a Tall Triangle Shape
Instructions Written by Sandi Marshall
 Isosceles Triangle Definition = A triangle with two equal sides.
This is a basic, (no fancy stitches) pattern that I worked out for those times when you want to crochet a triangle that is long, tall or skinny, which is a shape different than usual triangle patterns will result in. I used plain single crochet and double crochet with decreases but with the tweaks that will make it taller than you would get with traditional triangle patterns. I also included some extra photos that are a refresher for decreasing in single crochet and photos that show the resulting shapes using my instructions. I experimented with a tall triangle and an even taller triangle and wrote down the instructions that I came up with so you have this opportunity to crochet these too.
Materials: You can use any yarn or crochet thread (with the crochet hook size that corresponds with the material you have chosen to use). The thinner the material you use, the smaller your finished triangle will be.
I have made examples with worsted weight yarn and a US size H hook so you can see what those finished sizes are and estimate what size you might get with different materials. This is a quick project so the way to get the actual finished size is to just go ahead and make one with the weight of yarn or size of crochet thread that you want to use. Then adjust the materials you use to get the finished size you want, when you are going to make more of these triangles.
Starting Chain: You can use any starting chain, in order to result in the size triangle you want. You may want to make a practice one first with the starting chain I have given here as an example, so you have the idea of 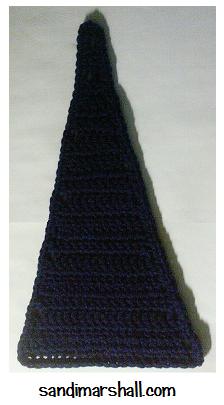 the decreases to do and the rows in between the decrease rows. Then it will be easy enough to start with a different starting chain number and still know what you are doing to get the tall triangle results.
At the end of the pattern, I have given additional sets of instructions that are geared especially for following when you use a starting chain other than the example I have given here. Use it to crochet triangles with any starting chain that you want to use.
Finished Sizes: This depends, of course, on the materials you have chosen to use. To give you a general idea, here are the finished sizes of the examples that I made with the starting chain of 22 chains, worsted weight yarn and US size H hook:
With the first set of instructions used, with the US size H hook: Regular worsted weight yarn – Without outside round added: Row 1 is 6 inches wide; height: measuring from the middle stitch of row 1 up to the point of the last row = 9 inches high.
With outside round added: Row 1 is 6 1/2 inches wide; height: measuring from the middle stitch of row 1 up to the point of the last row = 9 1/2 inches high.
With the make it even taller set of instructions used, with the US size H hook: Regular worsted weight yarn – Without outside round added: Row 1 is 6 inches wide; height: measuring from the middle stitch of row 1 up to the point of the last row = 11 1/2 inches high.
With outside round added: Row 1 is 6 1/2 inches wide; height: measuring from the middle stitch of row 1 up to the point of the last row = 12 inches high.
People crochet with different tensions also (tightness or looseness of stitches) and that will make a difference with the exact finished size your crocheting results in. In general, these triangles do not need to be an exact finished size but if you have a reason to want yours to be a certain size to fit the project you have in mind, you may want to make a practice one and measure before you make multiples for your project.
As I said, these triangles crochet up quickly so your best bet is to go ahead and make one with the yarn you want to use and then you will know what size you end up with. From there, if the size doesn’t suit you yet, you could use a smaller or larger hook, if needed, or use a different yarn brand or weight to get the finished triangle size you are aiming for.
Abbreviations: ch = chain, dc = double crochet, sc = single crochet, sc dec = single crochet decrease
Crochet Pattern Directions:

Note – Be sure to leave a length of four to six inches before the first chain so you have a length to weave in later, to secure the end of the yarn or crochet thread material that you are using to crochet this.
How to sc dec: Insert hook in first stitch (of the two stitches that will be used to make this single crochet decrease), yarn over hook, pull that loop through that first stitch (you now have two loops on the hook), insert hook in the next stitch, pull that loop through that stitch (you now have three loops on the hook), yarn over hook, pull that loop through all three loops that are on the hook. That completes the single crochet decrease, which has decreased two single crochet stitches into being one single crochet stitch. On the next row, when you come to that spot where you made this decrease, you will now be working into the one stitch (where, before you made the decrease, you would have been working into two stitches instead). See how that works?
Note – You will turn at the end of each row.
Starting Chain: ch 22.
Row 1: sc in 2nd ch from hook, sc in ea ch across (21 sc)
Row 2: ch 3, dc in next sc, dc in ea sc across (21 dc with the ch-3 that started the row counting as the first dc)
Row 3: ch 1, sc dec over first 2 dc, sc in ea of next 17 dc, sc dec over last 2 dc. (19 sc now in this row) (Remember that the ch-3 that started the previous row is now the last dc of this row and is one of the two stitches that you will be working the sc dec over). If you accidentally skip working in that ch-3 (that counts as the last dc of this row) then you will accidentally decrease by one extra stitch and the shape will be off.
Row 4: ch 3 (counts as first dc), dc in ea sc across.
Row 5: ch 1, sc dec over first 2 dc, sc in ea dc across until 2 dc are left, sc dec over last 2 dc (one of which is the ch-3 at the very end of this row).
Repeat rows 4 – 5 until only 3 stitches remain then do a row 4, then on next row: ch 1, sc dec over the first 2 dc, sc in last dc. Next row: ch 3 (counts as first dc), dc in last sc, then on next row: ch 1, sc dec over those 2 dc.
To Make a Triangle That is Even Taller:
Note – You will turn at the end of each row.
Starting Chain: ch 22.
Row 1: sc in 2nd ch from hook, sc in ea ch across (21 sc)
Row 2: ch 3, dc in next sc, dc in ea sc across (21 dc with the ch-3 that started the row counting as the first dc)
Row 3: ch 1, sc dec over first 2 dc, sc in ea of next 17 dc, sc dec over last 2 dc (remember that the ch-3 that started the previous row is now the last dc of this row and is one of the two stitches that you will be working the sc dec over). If you accidentally skip working in that ch-3 (that counts as the last dc of this row) then you will accidentally decrease by one extra stitch and the shape will be off. (19 sc now in this row)
Row 4: ch 1, sc in ea sc across the row.
Row 5: ch 3 (counts as first dc), dc in ea sc across.
Row 6: ch 1, sc dec over first 2 dc, sc in ea dc across until 2 dc are left, sc dec over last 2 dc (one of which is the ch-3 at the very end of this row).
Repeat rows 4 – 6 until 3 stitches remain, then do a row 4 and a row 5 then on next row: ch 1, sc dec over the first 2 dc, sc in last dc. Next row: ch 3 (counts as first dc), dc in last sc, then on next row: ch 1, sc dec over those 2 dc.
Finishing With an Outside Round:
When you have finished the last row at the top of the triangle, ch 1, then begin working along the left side edge. Do a single crochet around the end stitch of each single crochet row and 2 single crochet around the end stitch of each double crochet row, as you come to them. When you come to the end of a side, ch 2 to go around that corner then continue along the next side in the same manner. When you reach the end of the last side, ch 2 for that last corner, then slip stitch in the first single crochet of this outside round, to join the last stitch made to the beginning stitch of the round and give it a finished look.
If the shape is not coming out right for your triangle, check the following details:
Too Many Decreases: Are you accidentally skipping using the chain-3 at the end of a row as one of the two stitches used for a single crochet decrease?
Not Enough Decreases: Are you accidentally adding an extra stitch on the double crochet rows by making the first double crochet in the base of the chain-3 that starts the row, instead of in the single crochet after the base of the chain-3?
Directions Worded for Any Starting Chain of Your Choice:
Tall Pattern
Note – You will turn at the end of each row.
Row 1: sc in 2nd ch from hook, sc in ea ch across.
Row 2: ch 3 (counts as first dc), dc in next sc, dc in ea sc across.
Row 3: ch 1, sc dec over first 2 dc, sc in ea dc until only 2 dc remain, sc dec over last 2 dc (one of which is the ch-3 at the very end of this row).
Repeat Rows 2 and 3 until only 2 or 3 stitches remain, whichever comes first (your starting chain number will determine which happens first):
If 3 stitches remain after a Row 3 repeat then do a Row 2, then on next row: ch 1, sc dec over the first 2 dc, sc in last dc. Next row: ch 3 (counts as first dc), dc in last sc, then on next row: ch 1, sc dec over those 2 dc.
If 2 stitches remain after a Row 3 repeat then do a Row 2, then on next row: ch 1, sc dec over those 2 dc.
Even Taller Pattern
Note – You will turn at the end of each row.
 Row 1: sc in 2nd ch from hook, sc in ea ch across.
Row 2: ch 3 (counts as first dc), dc in next sc, dc in ea sc across.
Row 3: ch 1, sc dec over first 2 dc, sc in ea dc until only 2 dc remain, sc dec over last 2 dc (one of which is the ch-3 at the very end of this row).
Row 4: ch 1, sc in ea sc across the row.
Repeat Rows 2 – 4 until only 2 or 3 stitches remain, whichever comes first (your starting chain number will determine which happens first):
If 3 stitches remain after a Row 3 repeat then do a Row 4 and a Row 2, then on next row: ch 1, sc dec over the first 2 dc, sc in last dc. Next row: ch 3 (counts as first dc), dc in last sc, then on next row: ch 1, sc dec over those 2 dc.
If 2 stitches remain after a Row 3 repeat then do a Row 4 and a Row 2, then on next row: ch 1, sc dec over those 2 dc.
Other Triangle Crochet Patterns: If you are looking for a triangle shape that is more like the shape of a triangle head scarf, use this link for that page on this site: Basic Triangle Shape Free Crochet Pattern.
Copyright: Pattern instructions written by Sandi Marshall, copyright 2013 and beyond by Sandi Marshall. This pattern is not to be republished elsewhere without the express written permission of Sandi Marshall. Do not sell or give away by reproduced copy in any form (putting it on another web site or blog would be a form of republishing).
Of course, you can print out this page or save it in some form for your own personal use but you may not redistribute the contents of this page – this pattern – to others, even for free. Instead of redistributing the actual pattern in some way, giving out the url link to this page to others is the right thing to do. You have no idea how much that would encourage me to put time and work into creating more crochet patterns and writing out the directions for others to be able to crochet my designs too. I’m sure other pattern designers feel the same way, so this is something to keep in mind, when you come across the work of pattern designers that you would like to encourage to do even more designing.
Linking to this Page: Links to this page are welcome (you don’t have to ask me first, you can just go ahead and link to it). You may give the url of this page to others so that they may come to this site for themselves and benefit from everything this site has to offer. Thank you.
URL link of this page is https://www.sandimarshall.com/long-skinny-tall-isosceles-triangle-free-crochet-pattern

Comments are closed.